Camper Trailer
We owned a Wild Boar Forward Folder Camper Trailer for around 2 years and used it for two long trips and a number of shorter ones. We enjoyed camper trailer life but decided to upgrade to a hybrid offroad caravan mainly because we'd like to do a "big lap" trip in a few years and the extra comfort and ease of setup will be needed. The camper would have been well suited for a couple of further years of shorter trips at least but once the van idea took hold we couldn't shake it.
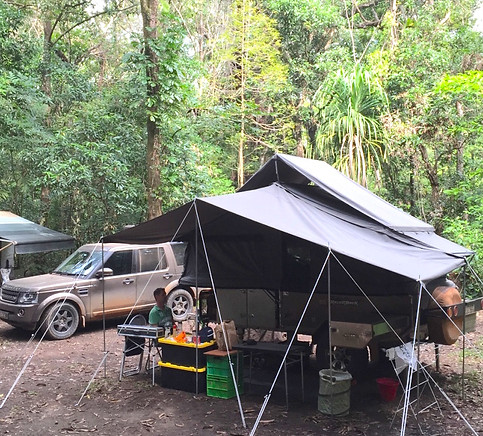
This page will probably jump around in timeline and topic but my intent is to cover things such as what the CT came with, what we added/changed, how it performed for our needs and thoughts on travelling with it. Neither of us are particularly "handy" or have a trade so the DIY mods are pretty low key. And this was our first CT, so no direct comparisons to other types/formats other than our own observations along the way. Well anyway, that's enough words without a photo .... in use at Hann River Crossing, Lakefield National Park.

Perhaps some facts and figures to start. Here's a website link:
http://www.wildboarcampers.com/camper-trailers/razorback-forward-fold/
I'll mention some of the highlights that contributed to deciding on this one. Note that things have steadily improved over the years since we purchased based on customer feedback, so some of the features and changes I made are now standard.
Firstly we decided on a forward-fold configuration pretty early on in the research. We liked the idea of everything up off the ground and the amount of internal living space that comes with the format. Another good feature is that its open footprint is the same as closed, nothing to the back or sides. So it's really good in small sites and for single night stops. On our cape trip we often didn't unhitch but still had access to the back of the vehicle. The canvas on the main side can be zipped right open (not just a window). Very nice if stopped for a bit and the weather is good. The photo was taken on the first day, so plastic film not yet removed from seats, just like Grandma's place.
The Wild Boar one came with most things we wanted/identified during the research phase:
- slide out kitchen with SMEV cooktop and sink with tap
- twin gas bottles
- 120L s/s water tank c/w water pump and digital level gauge
- front storage box with 5 sliding drawings across four compartments
- pole storage compartment
- 2 x 100ah batteries with 240V charger
- heavy duty cable to drawbar for solar or vehicle charging
- double spare wheel holder (one converted to twin jerry can holder)
- two extra jerry can holders on draw bar
- fully carpeted inside and on all sliding drawers
- additional water tap run to the draw bar
- LED strip lights, multiple cig sockets (inside & out) and twin usb socket
- window awnings included c/w short poles
- zippers on inside and outside to all windows


That's probably enough listing of features, I expect to talk about many of these things along the way. The base format is similar to many other chinese fabricated, locally assembled offerings. But we felt that there was a few little extras setting it apart. Plus we liked dealing with Paul and Nicole (owners) and their little crew. The chassis is claimed to be 100x50x4 HDG and I have no reason to doubt this. The fabrication quality appears reasonable to me (mechanical engineer but not a welding expert). In any case, the chassis & suspension held up well to a Cape York pounding.

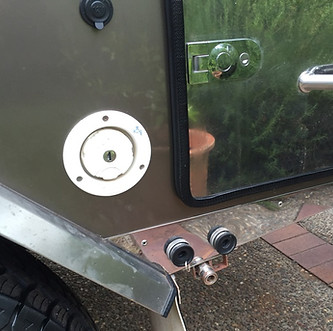
Starting at the front .... upgraded to a Vehicle Components DO35 hitch straight off showroom floor. My Dad has been using one for many years, currently on his AOR Quantum. But we had decided that this was our preferred hitch anyway, so it's a bonus that we can swap between towing if travelling together (as was the case on the Cape). Well worth the extra ~$200 over the standard tregg-copy or whatever it was.
That's an aftermarket hitch on the D4 too, the Mitch Hitch. It puts the draw bar perfectly level. Hitching and unhitching is a very straightforward process with the combination of DO35 drop-on pin, reverse camera with guide lines and air suspension that I can raise and lower as required during the process.


One of the first accessories purchased was a Stone Stomper to protect the vehicle rear window and CT but to be honest I mainly care about the vehicle. It is one of those products that actually works as promised. The photo is from its first fitting at Cooktown and it stayed fitted from there on for the Cape trip. Makes it a little slower to get into the vehicle rear when dusty and/or muddy but all you have to do is unclip the front edge to fold the mesh out of the way temporarily. There is a skirt attached to the cross bar on the vehicle which blows upwards when driving thus closing the gap where the mesh clips on.
Website: http://www.stonestomper.com.au/
In the photo you can also see the replacement heavy duty Ark Extreme Offroad jockey wheel, which is an excellent bit of kit. The one originally supplied seemed to be reasonable quality actually but we just wanted to be extra safe and certain on soft/wet/rough ground, which the dual wheel Ark does very well. It also has extra vertical movement.
In this photo you can see the powered jockey wheel. It lives at home only and is for navigating up and down the driveway (very narrow). Also excellent for getting the camper out for quick things without the fuss of hitching etc. Well worth the money. Purchased from eBay and came with an Anderson plugged power lead. I leave the mounting bracket on permanently. It works well but would struggle on grass or any more incline than our quite gentle driveway slope. Camper weighs around ~1500kg when jockey wheel is used.
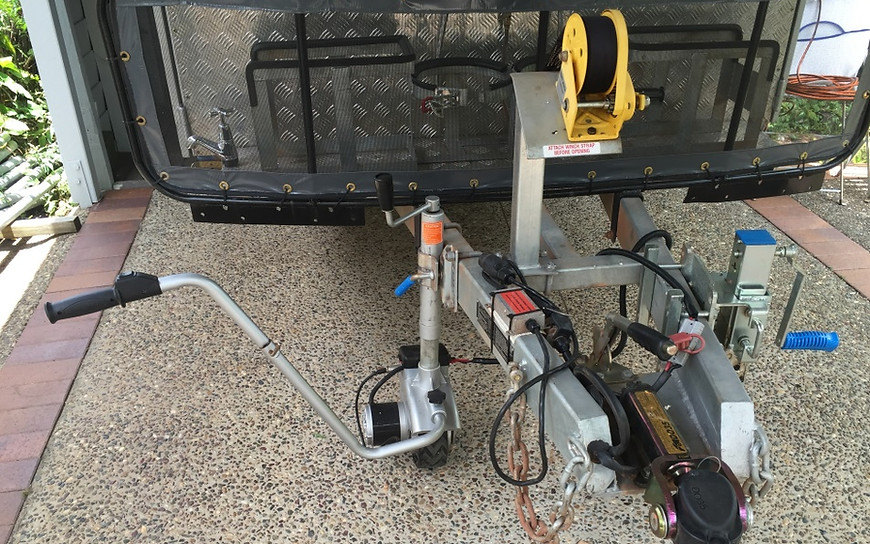
The little box with red label on the draw bar is to ensure that the Land Rover recognises that the CT is there, required due to only having LED lights. When a trailer is recognised, it adjusts the transmission program to suit towing and ensures the Trailer Stability Assist (standard for D4) is active. The yellow boat winch came with the camper to assist with opening and closing the main forward fold mechanism.
Behind the mesh stone guard lives the two gas bottles and two jerry cans. You can just make out the change-over gas tap on the photo below. This was our request as an extra feature. Sometimes we simultaneously run a separate cooker directly off one disconnected bottle while the main CT cooker is in use. But also useful when one bottle runs out ... just flick over to the other bottle and keep cooking!
Note also the front tap. Very handy for washing hands etc. Another requested extra after seeing similar on camper forums. The jerry can holders and gas bottle holders all came with the pinchweld rubber seal attached to ensure a tight fit on rough roads.


This is the scene from the day of Stone Stomper test fitting and mounting bracket installation .... that's just how we like to roll.
In these next photos you can sort of make-out how we use the front box on the "living" side. Fridge on the left and pantry on the right.
The setup and arrangement is very practical, with good access to the kitchen and all is under the awning (when it's up). The pantry is a plastic crate that's see-through and sits on the drawer slide. This works ok. I used to think about ways to make better of use the space but never came up with anything before selling the camper. Slightly tricky because the top corner is obstructed by the pole storage cavity which runs right across the camper.
We have a Bushman fridge. It's a good unit, quiet with reasonably low power draw. However we have suffered from cracks in the internal casing (white plastic). Both the initial one and the replacement. Doesn't affect performance but is still concerning even though it's still going 3 years later.
We have two roll-up camping tables that go into the camper and the other table fits into the rear drawers in the D4. It's a Drifta rear drawer unit. The Drifta table legs are telescoping tent poles that also fold flat. Excellent design.


In this photo you can see the other side of the camper, which is the main storage side. On this side of the front box is two doors, one with one slide and one with two slides. Plus the two smaller storage bins, which hold the levelling ramps, wheel chocks & extra cooker in one and the back one is the batteries plus main isolator and charger. You can also get into the battery compartment from inside, which would be necessary for battery changing etc although we had zero battery issues when we had it.

All the doors include decent car-type rubber seals that attach via pinchweld. There has been a couple of small spots of dust ingress in the storage compartments where the seal has not been complete or perfect around corners. But even then it was a small amount. And virtually no dust got into the main living compartment, which is protected by a similar seal that compresses when the main lid is clamped shut.
You can see the drawer slides out in this next photo and the front battery if you look hard. Another feature we really like is visible in both photos ... the window awnings and the included short poles.

The window awnings have performed very well, even in heavy rain. You can see how we set them up on a slight angle so that water runs off easily.
We also like how there are zippered canvas window covers both inside and outside. We mostly leave the outside one up and zip the inner one closed from inside when going to bed. This also allows you to see the world when you first wake up without getting out of bed.
It's nice that one of the features that we felt set this CT apart has proven to work well. The window mesh has been really good too, with no insects getting in unless through the door as you go through it.
The CT comes with a very large ensuit/shower tent that zips on to this side but to be honest, we haven't used it. As you can see we have a good OZtrail Ensuite Instant Frame self-standing shower tent that works very well, packs up quite small and can be taken on trips without the CT. The provided ensuite room would no doubt be very good for bigger families and extended stays in one place.
We keep a lot of stuff on this storage focused side, including:
- Weber Baby Q (brillant for camping)
- Potable water hose with BEST filter (excellent)
- Solar gear (will do full post about this, very happy with setup)
- Cgear sand-free mat (excellent product that really does work as advertised)
- Interlocking plastic tiles from Ikea for wet feet outside shower.
- Shower head and pump in a little blue box (Primus). Works well and packs up conveniently.
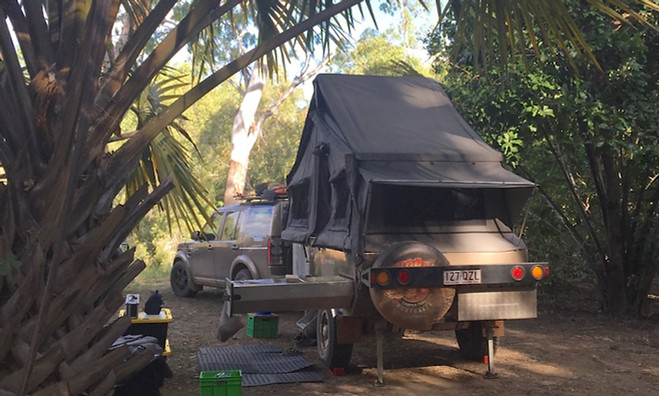
.... moving around to the back. Only thing to mention here is we chose to fit out the 2nd spare wheel holder with a double jerry can carrier. It's fabricated from checkerplate & is deep enough that you can't even see the jerrys. I drilled a couple of holes for water draining. Lakefield NP, 12 Mile Campground, Site #1. Absolutely perfect.
It's simple to remove if you need to fit a 2nd spare wheel, with the wheel carrier actually still in place between the jerrys. We carried a 2nd vehicle spare on the roof rack. It is rather difficult/expensive to convert/modify hubs to suit Land Rover wheels so I didn't bother. I have however seen it done on an Ultimate Offroad Camper. We often didn't bother with any awning or floor mat for shorter stays in good weather, which happened a lot on the Cape.
The main living area. The camper comes with a huge full-room type setup; large awning, walls, floor and side skirts. It looks very good and most likely goes together well. But we never even set it up. That's not the type of camping we've done or are likely to do. My gut feel is that it would be perfect for large groups and/or long stays in one place.
What we carry and use as required is the 2m awning without sides/walls. It is 2m wide and runs the full length of the tent. It zips on through the full length and the zip is covered by a storm flap of canvas. It is proven to be water tight and has stood up well in some pretty heavy rain situations and is pretty good in wind too, except for Capt Billys Landing but that's another story. Let's just say no awning on earth would have been good at that place.


The awning size provides good coverage for most situations. The kitchen is well covered. You can still work around all your stuff if it's all pulled in close during rain, although it is tight. And when dry you can push everything further out and have a good space.
It requires 5 poles to set up and this was made easier with the better dual-rope guy ropes I bought that you see in all the photos. These ropes have a better tensioning gizmo and in-built attachment loop. Nothing wrong with the supplied ones, just harder/slower to use.
Our main complaint is with its peaked profile following the tent line. In our view this makes it unnecessarily difficult to setup straight and tight, which you can see in some of the photos. It works but looks a bit wonky and is not that easy to get the zip on either. This also makes it slow, at least for us. I have marked up the picture below showing what we think would be a better awning setup. Others apparently don't agree. Paul (owner) tells us that most people like the awning and don't consider it too much trouble. Although we have seen similar campers with an awning exactly as per my sketch.

With practice you can leave the awning zipped on when you close the camper. But we found this to be not worth the extra effort and preferred to zip it on and off as required and then pack it flat inside the camper. It comes in a nice PVC carry bag that keeps everything clean and dry even if the awning itself is packed wet.
Please note that these are not heavy criticisms and I believe that most, if not all, CT awnings would be similar (unless they have our brilliant redesign already). Once it's up it's really good and probably some of the issue is technique and practice, given that we have only put it up about 7-8 times in all the nights we've used the CT. I'd love to try out our redesign but think it would be prohibitively expensive for only a small improvement.
The kitchen is one feature we were very happy with. It runs on heavy duty sliders and doesn't need any extra support when fully out, even though it weighs a fair bit. The 3 burner SMEV has been good, although you can't get 3 things on at once so really a 2 burner would make more sense. The sink and tap also work well. The 12V water pump is bolted inside the main tub area and is accessed from a hinged lid under one of the seat cushions. I purchased a complete water pump to carry as a spare even though we have had no issues at all on the Cape trip. This proved a good decision because the pump failed on our Red Centre trip the following year.

We requested an additional gas bayonet fitting so that we could connect and run the cooker and Weber simultaneously. In this photo you can see the 2 x gas fittings (black caps), 1 x water fitting (quick connect between gas fittings), 12V outlet for cooker spark ignition and lights etc and the water tank filler. The kitchen provides good bench space too when not in use and with the glass lids to the sink and cooker closed.

So how did it go on a 7,500km journey to Cape York and Western Queensland and a similar one to the Red Centre?
Well in short, very well with few issues. We did have some fears given the bad stories you read about chinese fabricated trailers. But our view now is that with good preparation and appropriate spares we'd be happy to take it it to more remote places, notwithstanding that we have now moved on to a hybrid caravan. The van change was not for reasons of reliability. We do realise that Cape York is not the worst conditions that you can face in Australia but still a good test. I believe the chassis and suspension are strong and solid.
Anyway, an honest assessment of issues we experienced as follows:
- water tank leak (twice and then tank replaced)
- shock absorber oil leak
- minor water wicking at velcro tab (issue fixed before trip)
- minor dust ingress to storage compartments where seals not quite perfect (described in earlier post)
- water pump failure in the second year
The water tank is stainless with internal baffles that are spot-welded. One of the spot welds let go from corrugations and this opened a pin-hole in the tank bottom. I had metal repair paste and silicon sealant with me but chose not to bother with repair "in the field" because we had already reached the Cape and were travelling with other people who had plenty of water anyway. This was repaired as warranty without question by Wild Boar and I was told that extra weld was put at all the spots to prevent a re-occurrence. I was considering perhaps a replacement poly tank but stuck with it. Sadly it did the same again near the end of the Red Centre trip the following year and was replaced with a very strong looking poly tank without question, which was how it got sold (with full disclosure to new owners).
The trailer has independent suspension with dual shocks per side but they are no-name chinese shocks. There was an oil leak from one shock on each side with one being worse and causing a slight sag but no failure. I again chose not to bother with replacement up north and everything held up fine. All 4 shocks have since been replaced as warranty without question. I considered replacement shocks but decided to persevere and had no issues on the Red Centre trip.
There is a couple of velcro tabs stitched into the tent at a seam. A very small amount of water was able to wick in the velcro and drip during a torrential downpour on the very first trip to Armidale. The seam itself did not leak and an additional liberal dose of seam sealer at the two points where the velcro is located was done as warranty. One of the internal LED strips was also replaced at the same time with a broken connection. No issues with the lights or water leaking since then.
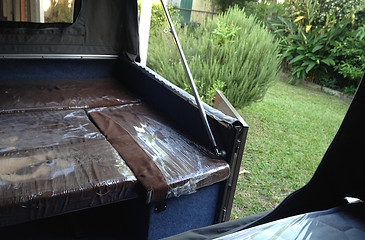
Not an issue from the road but we did replace the inner spring mattress with a foam one before the trip. The inner spring was just too stiff for us. The foam one is just a good quality bedding foam cut to the required custom size (slightly different to standard queen size). Saved weight too.


Solar Setup
I have put together a setup that I think is pretty good but also flexible. I wanted an arrangement that would also be useful when camping just with the car. It seems to work quite well and when the sun is out I can easily get 15A. I spent a bit extra to get what I believe is a good quality MPPT controller.

Everything is connected by Anderson plug. I bought an Anderson specific crimping tool off eBay to do the components that were not supplied with them already.
The hard-case 150W panel is from Anaconda. I think there is better ones and probably more cost effective ones but I didn't know much at the time and this was the first purchase. Does come in a decent hard case with a good carry handle but it's quite heavy too.
I have bypassed the 10A PWM controller that it came with (still attached to the back). Not a big job to revert to using that controller if required as I have used screw-in terminals in a little black junction box stuck to the rear of the panel.
Parts for this purchased from Jaycar. It also came with its own power meter.


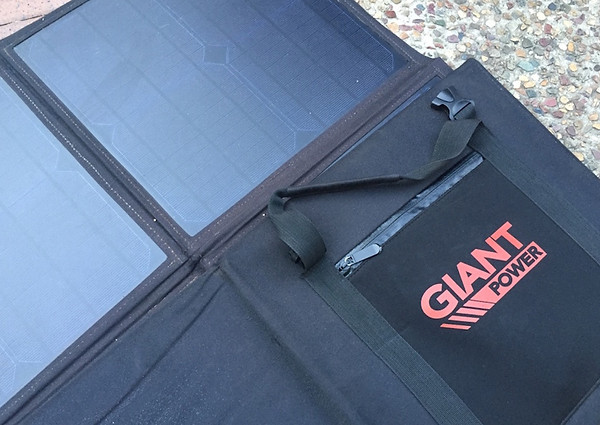
The folding 120W panel is Giant brand. I use it by itself when we camp just with the car. It's been excellent, getting 4A in average semi-sun conditions and more in full sun. Packs up nice and small.

In this photo below you can see the MPPT controller and the two-to-one cable, as well as the power meter. I put the power meter and controller as close as possible to the batteries. Because the hard-case panel has its own power meter I can get a rough idea of what each panel is contributing too.
The controller is a BlueSolar MPPT 75/15 from Victron Energy.

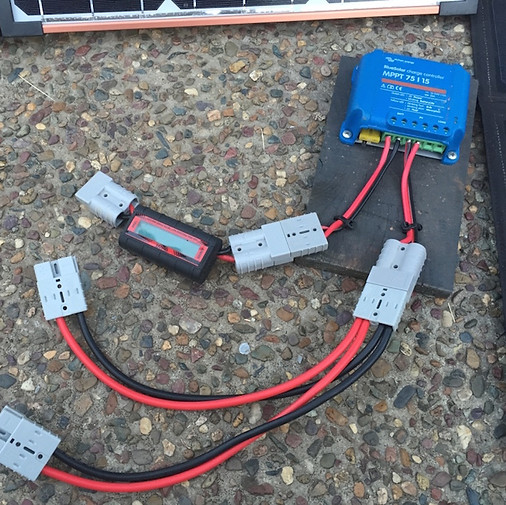
The power meter came with the folding panel. The two-to-one cable is from Jaycar. I was going to make it myself but too easy to buy it already done.
It all sits quite nicely on the draw bar when in use as per the photo. I just mounted the controller to a bit of wood and held down the cables with zip ties through the wood. This way there's no force put on to the terminals when plugging and unplugging. Bit rough but it works. When we just have the car, the controller sits on the tailgate or towbar so that I can connect it to the rear charging cable. This is why I haven't mounted it permanently.
The cable to the batteries is also used when towing so that I get a charge from the vehicle, where I have a dual battery setup with a high-capacity cable run to the rear of the car. The cable runs inside the trailer chassis until close to the battery box.
I find this arrangement works well and is nice and simple too. The only change I am contemplating is another extension lead, simply because at many sites you are under trees. Great for camping but ordinary for charging solar panels, so would like to be able to get the panels further away.
This is a good little item that we asked Dad to make up for us after seeing his work so well when we were travelling on the Cape. It's a wind barrier for the cooker. It opens at the front for easier access when cooking. Sections of aluminium sheet are joined with pop-riveted piano hinge so that it folds flat. We added pinchweld to the edges rather than have metal-on-metal contact to the cooker and to protect hands from sharp edges. Finished off with a canvas bag made by Sarah from the MySwag forum.


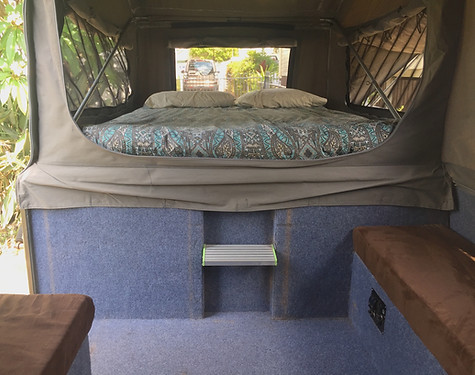
And finally a couple of interior shots to give a sense of what the living space inside is like.