Land Rover Discovery 4 - 2014
I’m now at the point where just about everything I want to do on the D4 is complete. Well almost, I do enjoy mods ……
Anyway, I thought it might be useful to put together some details of the significant accessories and modifications to date with a few photos. There is a mix of vehicle-specific and more general accessories.
I’ve had the D4 for 10 years now, MY14 purchased new. I’m currently at 206,000 on the clock (Oct 2024). We use it across a wide range of activities, in all of which it excels and this is why I love it, versatility. I loved theRange Rover Classic I had in the 90s but the D4 is by far the best vehicle I’ve owned. It is luxury city transport and daily driver, mini bus, outback tourer and tow horse, camping base station and 4WD play toy. It is in my view an amazing feat of design and engineering that one vehicle could be all these things without major modification or compromise. I wrote a kind of long term review at the 3 year anniversary here. which seems quaint as I'm now at 10 years and doesn't feel that long term now!
To provide an idea of context behind the modification and accessory list, here is a summary of our adventures that the D4 supports.
So far we have been on five extended outback travelling holidays to Cape York, the Red Centre, the Flinders Ranges, double-crossing of the Simpson Desert and a return loop through the desert and Flinders, each of which was away touring and using the D4 for an average of four weeks. For most trips we towed either a forward-fold camper trailer or small hybrid offroad caravan. We've also done a 26,000 km, six month lap through SA, WA, NT and outback Qld. And weekend adventures too many to list.
We have also taken it on a few short getaways such as Moreton Island and the Victorian High Country, both with and without the camper, so now feel the D4 is well resolved as a camping base station by itself or in towing mode. The adaptations required for overland trips, such as the desert crossing, involve seat removal to carry additional water and fuel.
10th Birthday
Couple of nice updates; power fold mirrors and CarPlay
intergration unit


I also enjoy day trips to challenging 4WD tracks just for fun, remembering that it's not heavily modified or running 35” mud tyres! But I am prepared to tackle terrain that push its limits and this entails some risk of damage, which is worth mitigating with protection plates. In some cases 4WD’ing on challenging tracks is combined with touring depending on where you’re travelling but mostly the difficult terrain is attempted just for fun as a weekend hobby.
And finally it is also a daily driver for commuting and other general city driving duties. For these duties it really doesn’t need any modifications, being excellent straight off the showroom floor but this need also limits how far I am prepared to modify things just for the odd 4WD adventure.
I have tried to order things by importance but that’s a very subjective thing and just my opinion. Every time I look at the list I see different priorities but I have grouped some things together logically rather than by priority. And of course some modifications are multi-purpose, being useful for extended outback travel and 4WD’ing for example.
So here goes …. firstly a summary of items that I intend to blather on about in tedious detail (with links to navigate to each topic).

Wheels and Tyres
Wheel size and tyres; probably the most talked-about modification, covered endlessly on forums and groups chats, so I might as well cover that one first. It should be noted that the wheel size situation is quite different between earlier models and later models, with the 3.0L engine and its associated larger brake setup being much more restricted.
To my knowledge there are three completely legal 18” wheel options for Australia for the 3.0L D4 but no such problem for the 2.7L engine, which can even accommodate some 17” wheels. Initially the Compomotive PD1881 wheels commanded a premium price and this tended to be quite a barrier for some people and hard to get your head around when other vehicles have plenty of options for wheel make and size. But more recently the Tuffant 18" steel & alloy wheels have become available and another alloy (Moab) similar to the Compo. There are other 18” wheels that can fit after modification to the brake caliper casting. The other thing to watch out for with alternatives is offset and it is difficult to keep within the legalities around track offset in every Australian state.
For me, the expense of Compomotives were well worth it but the Tuffant would be the pick if I was starting out now. I am lucky enough to have owned set of Tuffant steelies and now the alloys, which took us right around Australia during 2021. I moved the Compos over to the 2005 D3 V8 petrol we bought late in 2020. The Tuffant alloys have the highest load rating. The 18” wheel opens up a wider range of good quality LT and AT tyres, as well as a couple of MTs.
EDIT for 2024; setup (since last year) is I think the best so far. A set of Tuffant Kimberleys and Maxxis RAZR AT811 in 265/60/R18
These wheels look fantastic and are very strong with an excellent load rating (better than factory both in looks and rating)


I have used and worn out a set of Bridgestone D697s, then BFG KO2s, followed by Mickey Thompson Deegan 38s (still on the D3). For the 2021 big trip I decided to try Nitto Ridge Grapplers. I have taken them out for a few excursions on various surfaces but mostly rocky and/or scrabbly, loose tracks. Their grip in all these situations has been excellent. They've had a pretty hard life so far. I had a set of Monsta Mud Warrior MTs on the Tuffant steelies. They were ok but not really suitable for touring and daily driving.
All these tyres are an LT spec, which generally correlates to higher strength and this is important to me for outback travel and offroad trips. I have seen numerous AT tyres suffer sidewall slashes and cuts that so far (touch wood) the D697s, KO2s and Nittos have been immune.
Regarding tyre size for 18” I am running 265/60 but there are two other sizes that fit and are quite popular; 265/65 and 285/60. I originally chose the 265/60 to be relatively close to the factory diameter of 255/55/R19 and to avoid any potential, although unlikely, issues with the warranty (claims of aftermarket modification causing the issue). However there are a couple of other factors relating to the bigger sizes that are worth considering when choosing a size

The larger sizes are difficult to fit into the spare wheel well underneath the boot, with both needing to be fully deflated to fit and even then it is a squeeze. Also the 285 hangs down 30mm lower for rear ramp angle clearance compared to factory but the 265 is only 10mm difference. And finally, the larger sizes do rub slightly at different locations at full lock and particularly when at access height. People who are running these sizes don’t report anything significant regarding the rubbing but it’s still another factor.
So far I haven’t found the 265/60 size to be wanting when compared side-by-side with 265/65 but I may consider going to that size in the future. [EDIT] I moved to 265/65 for the Nittos. Not really worth the additional fuel consumption when just touring. Will likely go back to 265/60 [/END] 2024 EDIT; that's exactly what happened back to 265/60


Suspension Height Control
One common issue for the D4 is the restrictions to offroad height (50mm above normal). It cannot be maintained at speeds over ~45kph with the factory control program. The vehicle dynamics are compromised at high speed when at this height, so the LR designers included an automatic return to normal height in the system.
Now there are a few situations where you actually want the extra height but are also travelling at say 50-60kph. For example, outback roads with high crowns and loose rocks or sandy tracks with wheel ruts and peaked centres.
Generally speaking, I agree that it is inappropriate to be driving fast at offroad height but I would rather be making the decision myself and accepting whatever compromise or consequences result. Thankfully there are aftermarket height control options that can alleviate this problem and offer other advantages; sensor rods, a suitable diagnostic tool or what I have, the Llams module.
The most cost effective but least convenient option is replacement sensor rods. Some have multiple attachment points so that they can be set back to factory equivalent without complete removal. However, you have to reach into each wheel well and adjust the rod to an offroad setting, which is where it stays until you reset back to normal. Reaching in to the wheel arch is awkward and annoying and means that once you’ve set it for the offroad height you won’t be changing back in a hurry, typically only once back on bitumen or graded roads.
It is also feasible to use a diagnostic tool if it has the required functionality, which mine does but more on that later. The tool is able to control the height in a more convenient way using your phone from in the cab.

I have Llams and find the convenience excellent, particularly compared to messing around inside dirty wheel arches to change rod height settings. The Llams module is controlled with a simple dial that can be mounted in a few places but I have mine on the side of the steering column. The module alters the input signal coming from the wheel height sensors to the suspension control ECU such that the ECU adjusts to what it expects to be the selected height but is in fact offset from that height, either higher or lower depending on the dial position.
I find that its ease of use "on the fly" means you can return to normal height more often even when offroad, which is often a better height to be at.
Llams also provides other benefits in recovery from certain ABS fault situations for which I won’t go into details in this summary. Llams is also very well supported by its developer.
The diagnostic tool is arguably the best of both worlds, offering both reasonable convenience and the obvious benefit of its main purpose, fault reading and clearing. If you could only choose one option this would be the one. However, it’s not quite as convenient as Llams and still relies on using your phone to change between any desired non-factory height modes. I got Llams before the iiD diagnostic tool but would still get both if starting over.
Dual Battery Setup
Auxiliary battery capacity is a common upgrade for most 4WDs that are used for camping trips or outback travel. For the D4 a Traxide kit was the ideal way to go for me. A few different kits are available, depending on your needs (e.g. winch). I was not experienced with auto electrical matters or interior trim removal and very hesitant to attack my brand new car, perhaps blow something up or break trim. Well I'm glad I took the DIY option. It's great to accomplish something yourself. The instructions are thorough and Tim (owner) is happy to help over the phone. This was the first mod I did, other than changing the hub caps.
The kit I had includes an isolator (SC80) that disconnects the auxiliary battery from the cranking battery at a low voltage cut-out and then reconnects when voltage is raised sufficiently. It also incorporates a secondary cut-out device that prevents the connected accessory sockets from draining the auxiliary battery. The complete wiring loom is supplied already cut to correct length for these devices and two 12V sockets in the boot area. I have subsequently spliced off this loom to power other devices (UHF and tailgate lighting) so that they can be active even when the vehicle is off but still protected if accidently left on.
The kit came complete with battery tray, pre-cut wiring and connectors to suit the vehicle and most importantly, very detailed installation instructions. I’ve found it to be an excellent source for all powered accessories in the vehicle. Some people are concerned that the isolator keeps the cranking battery connected to the auxiliary to access capacity in the cranking battery down to a relatively low voltage. I understand this concern but have never had an issue with starting even after running the linked batteries down to 12.0V when camping
.

Eventually the isolator failed in 2022 and I decided to replace with a simpler & cheaper option, the Kickass 12v 140A VSR. It doesn't have an in-cab display/controller like the newer SC80 and also doesn't automatically keep starter/aux linked after the engine is switched off. But I didn't feel the need for these features, plus the Kickass VSR does have a switch that allows me to link starter/aux manually if ever that seems necessary such as perhaps a failing starter battery. I mounted the VSR to a bracket attached to the battery tray and retained the batteries, wiring and accessory outlets.

In 2020 I added an additional auxiliary battery, the SSB HVT-70D 85ah AGM. Fitted to a purpose-built box that sits in the second row footwell in front of a platform and storage unit I built for long trips (further details below).
I was finding the auxiliary capacity to be a bit underpowered for trips without a lot of driving and/or reduced access to sunlight for the solar panels.
Also changed the under-bonnet battery to an SSB HVT-50D after finding the Optima to be unreliable (and I'm not the only D4 owner that's had significant issues with the Optima battery). Added bonus is a small increase in capacity to 60ah.

I have considered an upgrade to lithium many times but it's quite a lot of work (and cost) to alter my system and it functions well for my needs so I've just left it alone ..... for now.
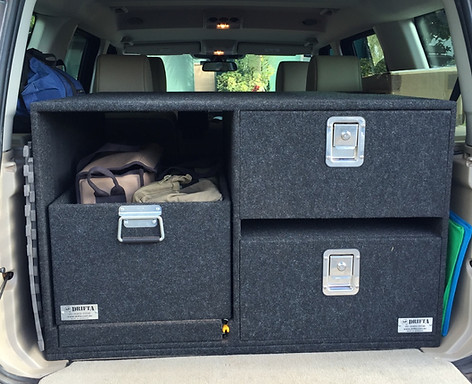
Rear Storage Drawers
I purchased a set of removable drawers from Drifta in Gloucester, NSW. There are an absolute myriad of options and layouts for rear storage to suit the many & varied uses people have and a lot of DIY goodness out there but I don’t have the requisite skills to achieve the quality I wanted. The drawer unit has been excellent for supporting our extended touring and also shorter camping holidays, as well as day trips. It includes a fridge slide and two large drawers, as well as a collapsible table that slides in between the two drawers, which is absolutely fantastic when camping or day-tripping. We have since bought a larger version of the table for the caravan.
The unit is easily removed by two people, so lives under the house when not required. My only slightly negative comment would be weight, it probably weighs ~5kg more than absolutely necessary but is solid and robust as a result. Having said that, it is lighter than any other commercial units I'm aware of. It makes use of the four factory tie-down points, with a turnbuckle at each one to keep it in place.
There are many ways to go with rear storage and I have seen a number of clever options that are more modularized or low profile compared to mine. So it really depends on your intended use and is worth giving careful thought and looking around at what others have done.


Pacific Baza
More recently I have added an extra slide out table and work surface out of a sheet of stainless steel. It nests very well into the fridge slide and is a great addition when camping.
You can also see the National Luna fridge that replaced the first Bushman. It has a dedicated freezer section and well designed internal baskets that help make good use of the space. We find that it works very well and makes better use of the same space.
Third row seat temporary removal means that extra storage space becomes available under the drawer unit. It also reduces weight by approx 40kg which helps with payload when on longer & fully loaded trips.


I made a couple of brackets to support the drawer unit when the seats are removed. You can see the carpeted floor and brackets in the photo to the left, as well as the back of the drawer unit about to be slid into place. Brackets are bolted where the seats were attached. Access to the under-space is through cutout under drawer and similar below the fridge slide.


In use, camped right on the Great Australian Bight
The "long trip" setup now also includes a platform and storage to go in place of the temporarily removed second row seats. The platform allows for storage of water bladders and other items underneath while the upper box includes two "his&hers" storage bins, usually for clothes. The lower unit has feet that
align with the seat mounting points
The Camp Cover brand storage pockets attached to the cargo barrier
also works in very well with this setup. I also have a cargo net attached
to the grab handles and cargo barrier for things like hats and scarves.


Winch
No question this was the biggest, most complicated and challenging modification I’ve done on the D4. Including all the pre-work for the battery isolator there was at least 50 hours work, which I spread out over a few weeks. I think it’s come up pretty well. Main components are:
- Prospeed winch mount & fairlead
- Carbon Winch 12K
- Blue Seas ML-RBS remote control isolator.
A lot of the time was taken up in figuring out the best way to do something, to the extent that when helping a friend with his two weeks later it took close to half the total time to finish.


Creating the fairlead hole and shaped cutout to the front of the bumper took many hours of careful measuring and slow removal by Dremel cutting wheel and sanding disc. Other available mount options are easier but I think the effort was worth it for the neat finish achieved. The freespool can be reached through the bumper & is quite easy to operate.


I put the isolator, wireless receiver, gearbox breather and small fuse block all in the driver side battery box out of harms way. The wiring is a bit messy due to using plugs for most connections and needing to have some slack but nothing is unprotected or likely to rub. This isolator has a manual function as well as in-cab switching, which I located in the overhead light binnacle. The little LED indicates when the isolator is connected and live.


The mount came supplied with a bracket to hold the solenoid, which is specifically designed for the Warn Zeon. However I adapted the bracket and the solenoid cover box that came with the winch, which took a bit of extra effort but came up pretty well.


The winch is supplied with both wireless and plug-in remote controls. I made up a bracket for the plug-in remote in front of the air box. This one is really just a back-up for the wireless remote, which lives in the glovebox.


Tow Hitch
For me the “Mitch Hitch” from Mitchell Brothers Offroad is an excellent upgrade/replacement for the factory hitch, which sits quite low. But the applicability of this upgrade really depends on what you tow and how often. For both the camper trailer and now offroad caravan the Mitch Hitch offers a horizontal draw bar height without using a tow tongue with excessive lift. This in turn maximises overall ground clearance when towing.
The hitch is also convenient for installing the tow bar mounted bike rack because it’s at a height that makes it much easier to install/remove compared to the factory setup. Some people consider it to be too expensive. I look at it as cheap compared to the Hayman Reece style tow bars or factory tow packs that other vehicle makes are saddled with.
It looks a bit rough in this photo, thanks to thousand of km's of rough outback roads with the Stone Stomper bracket bolted to it.

Electric Brake Controller
RedArc TowPro seems to be the most popular one and I am certainly happy with mine. Simple to calibrate and use.
There are a couple of critical things that must be done correctly when wiring in the controller that are particular idiosyncrasies of the Land Rover. In my view it is important to read and understand the requirements, even if having the work done by an auto electrician. There is an excellent forum thread for the details on AULRO. There are also a few locations to mount the control dial. The centre console is used but I have found having it mounted in the headlight switch binnacle to be both readily accessible and retaining a “factory” look.

Roof Rack
I have a Rhino-Rack Pioneer Platform. I have found the Rhino to be very versatile for carrying different things in multiple configurations depending on the trip type and length. Rhino offers plenty of optional mounting hardware but it’s also quite straightforward to fabricate your own brackets such as the MaxTrax mounts I’ve made up. It is only installed as needed for trips and I have rigged up a pulley system in the carport to hoist it off and store it when not in use.
A set of simple cross bars would also be useful for carrying loads from Bunnings or whatever. Much quicker and easier to install/remove.


Rhino-Rack Pioneer Platform
1528 x 1376 wide c/w RLTP legs x 4
RTS502 Trackset
(Rhino in lieu of LR factory tracks)


Rear Ladder
I have a Frontrunner rear window ladder. There was a few fitment difficulties but other people report having no trouble at all.
It’s a very useful addition for trips, making roof rack access easier and safer. Stepping from the tow point to the ladder and then up is reasonably easy now. I would rather not have something permanently fitted that's only for use on trips but it's not feasible to remove especially considering the difficulties with fit at the bottom mount behind the light assembly.
I have considered changing to a full length platform mainly to distribute more of the load towards the front of the vehicle. I don't really want a greater area to fit more stuff on the roof because the load limit of 75kg is pretty small and in any case I'd rather not raise the centre of gravity. At this stage I believe everything I'd want to store on the roof fits the short platform even for an expedition setup.

Bottle Jack
The Land Rover supplied jack is a rather flimsy scissor jack that is prone to failure and not to be relied upon when out in the middle of nowhere or on any sort of sloping ground. There are a few ways to proceed with upgrading to a bottle jack but it’s not straightforward because you need a low closed height and a significant raised height that most jacks can’t achieve except for large, high capacity, very heavy units.
However, I have found an Omega 2t unit to be quite good when used in conjunction with a solid steel & plywood baseplate. In the first photo you can see the bottle jack in action at home being used in conjunction with my trolley jack to lift the complete rear axle for a rear brake rotor and pad change. I don't carry the trolley jack on trips because it's too large and heavy.


I have an adapter that sits on the head of the jack. This replicates the top of the factory supplied jack and suits the holes in the chassis that are provided for jacking. Using them minimises the risk of any uncontrolled movement during the process because contact between jack and chassis is maintained without risk of slippage. The adapter is held firm with a grub screw which makes it easily removable for occasions when the standard jack head is preferable, such as jacking the caravan trailing arm suspension.
Tuffant now manufacturers a very nice version of the jack adapter.
The gear I carry all the time can be seen in the next two photos. The bottle jack together with a 5mm steel baseplate and two plywood plates. This makes a nice stable base for almost any ground condition and raises the jack approximately 15mm. In the other bag is an impact wrench and a tyre wrench with an extending handle. I sometimes carry the torque wrench on trips to be certain that the wheel nuts are tightened correctly but for day trips or city driving that's overkill because you can obviously just check when you get home.


Spare Wheel Winder
The spare wheel winch requires use of the jack handle to operate the winder. The winder interface was changed from a hex nut to a lug with a hole from around 2013. The scissor jack handle is a rod that looks like a shepherds crook, which not only requires complete unpacking of the rear to operate but also lifting of the 3rd row seats. This rigmarole is quite painful, especially when loaded up for travelling.
This modification is an adapter that allows use of a normal ratchet handle and socket extension bar, which is far easier to use but more importantly means you don’t have to unpack the whole boot or remove your storage drawers. The socket extension can fit down between the lowered 3rd row seats. A nylon bush is used in the winder eye to minimise backlash or rattle.


Protection Plates
The suspension compressor is probably the most vulnerable item of the underbody on a D4 and the first thing to consider protecting when venturing off road. It is on the passenger side just in front of the rear wheel and is only partial protected by the chassis rail. There are a couple of aftermarket protection options but the best combination of design, robustness, level of protection and local fabrication I’ve seen is the APT version. I prefer its extra frontal coverage and the way the inner side is mounted, which makes it easier for occasional removal for cleaning. Dirt, sand and mud collects inside the factory plastic cover and should be cleaned out regularly to stop damage to the compressor via overheating or contamination.
For me the second most important protection item would be rock sliders. Useful for protecting the doors and door sills when offroad, as well as being a sidestep. It is quite common on tracks to have obstacles close by that the slider "leans" on and you slide past. Again, the best I’ve seen is the APT product but there are other excellent versions out there. The seal is a DIY project to replace the secondary seal that's removed when rock sliders are fitted. The plastic sill treatment includes a ridge that seals against the bottom of the door and this ridge is not present when the sill is covered by the slider plate instead. I have attached the rubber seal to the door but others have attached a similar seal to the sill plate.
I also have added a front plate and transmission plate, again from APT. The front plate protects the lower edges of the radiators and the transmission plate provides a smooth flat surface to obstacles as well as protecting the transfer case. The transfer case is mounted up quite high and I haven't heard or read of it getting damaged but the general exposure of its small components has always made me nervous.
I am very tempted to get the sump guard too, to complete the "set", however I also think the factory one is reasonably solid. I suppose if it cops a good whack one day it will have done its job and then I'll replace with APT.


LED Tailgate Lights
I wanted more light at the back for camping and other times when using the tailgate at night. The factory boot light is converted to LED but extra lighting run off the aux battery available anytime via a switch is far more useful. I hadn't expected how much light would be available further out than the tailgate, as you can see in the before/after photo below. Note that the before photo is LEDs which are already greatly improved from factory bulbs.

This option is not for everyone, it involves drilling holes into the trim panel but it puts the lights in the perfect location for illuminating the lower tailgate and surrounds. I've found it to be the most useful modification for camping out of everything done so far.
The setup is four small "eagle eye" LEDs (3W each) and a rocker switch. The lights have a threaded tail and nut. The light appears quite blue due to the high colour temperature of the LEDs. It's not as noticeable in real life. Lights of the same design but with a warmer colour are available and perhaps one day I'll change them out but it's not really necessary.
Power is spliced off the rear aux socket cable that is part of the Traxide kit, located below the 3rd row seats, that I have also used for the UHF and fridge plug. Then run up the side trim and above the headlining where the factory boot light is located. From there I pushed the cable through the rubber grommet into the tailgate and tied it to the factory wiring loom, which runs around the perimeter under individual trim pieces.


For the wiring to connect individual lights together I drilled small holes through some of the fins in the plastic, which keeps things neat and prevents pinching of cables. You also need to be very careful with placement of the lights and switch so there’s no clashes with components of the rear window wiper and rear view camera. It initially looks like there's plenty of room behind the trim but it's actually shaped to be quite close to most things.

Jaycar sells Wiring Loom Braided Wrap that is self-closing, which is good for preventing abrasion & keeping things neat, so I used this in a few locations. I prefer this product to the hard plastic type of protection conduit especially for internal wiring.
I decided to add an "extension lead" to the power cable so that the trim panel could rest on the tailgate when removed and used small Anderson plugs at each end but probably wouldn’t bother with that if doing it again. It is convenient but adds connections and more cable to coil inside the trim.
For reference, the trim panel part number is ERQ000104PVJ and is probably around $200. I figured if I made a mistake or broke something buying a replacement wouldn't be the end of the world.

UHF and Aerial
The UHF is important for group day trips and outback travelling so I wanted a neat installation that also wasn't in your face all the time when not required. I came across quite a few good ideas but the key was to stump up for a higher spec model with all the controls and speaker on the mic, with the main unit mounted under the front passenger seat. I fabricated a bracket for the main unit that made use of existing mounting points under the seat but good quality double-sided tape works just as well.


For the mic, I wanted to have a minimal install that didn’t require stuff to be permanently fitted especially when not in use and came up with the idea of mounting the connection jack in the central cupholder. This is virtually invisible when the mic is away and is a good central spot for both the driver and passenger when in use without too much cable stretch. I've seen a lot of installations that are mounted near the driver making it awkward for the passenger to use. The Cat6 connector was supplied with the UHF so I just needed to thread the cable up under the centre console to the underside of the cupholder and put a hole in the cupholder side that provided a tight fit for the connector. Sounds easy when you say it quickly but was pretty fiddly and care was required to avoid damaging anything within the bowels of the centre console.


For the aerial I chose a purpose made stainless steel Lab Electronics bracket for mounting to the side of the bonnet at the hinge. A higher mounting on the roof rack will provide better range but I don’t leave the roof rack on full time and have found the bonnet mounting to provide reasonable coverage in close forest convoy situations and also more distant communication when on open roads. I have a Laser 6dB. A rubber chair leg cover keeps the threaded connector clean when the aerial is not fitted.


Something else you can see in the UHF photos is the matt black wrap applied to the gear selector dial surround. It is a shiny chrome finish that I often found to cause blinding sunlight to hit the eyes. It was another fiddly job, especially getting the cut-out shape just right. Jillian produced a very nice paper template and the first attempt at wrapping is still the one fitted today, a couple of years later. But if anything happens to it I still have plenty spare from the roll I bought at Supercheap Auto.
Manual Tailgate Release
This modification is something most people only consider once the tailgate actuator has failed but having read about the issue on the forum I decided it was something that should be addressed proactively. For long trips I have full-size rear drawers and a cargo barrier and the potential for an inoperable tailgate is a concern.
Once it’s broken fixing is possible but very difficult and not something I want to be attempting in the middle of nowhere with a boot full of gear. Imagine you are away from home with a cargo barrier in place and a full load of gear in the back. Or a pet stuck in the boot. The tailgate won’t open, what now?
My friend James suffered a failed actuator and came up with the idea of using a bicycle cable as the manual release, connected to the lock mechanism and run underneath the carpet to an accessible but hidden location beside a passenger seat. I followed his lead and while nothing is likely to fail for a couple of years I still travel with a better peace of mind. The bicycle cable is the innovative part, meaning you can run it further and snaked under the trim, which a simple wire can't do. This makes it both easier to hide and simpler to access.
I've written up some how-to instructions with photos for anyone interested.


Mud Flaps
The factory mud flaps are pretty hopeless (speaking from experience) so DIY is the way to go. Following the lead of others I have adapted D1 ones for the front and Defender ones for the rear, which include a rather fetching Land Rover logo that helps to aesthetically offset the rather pedestrian look of mudflaps. Part numbers for the Defender ones are LR055332 and CAT500450PMA


Cargo Barrier
The reasons are obvious and there are a few options for both full height and half height, which is what I went with. I don’t leave it in permanently and don’t use it to protect against loose heavy objects, therefore I’m happy with a smaller, more lightweight and easily removable unit called Trav-all. Something to keep in mind is the statement on their website: "As this product has not yet been tested to Australian Standard 4034.2:2008 it is not suitable for the restraint of heavy cargo". This is not an issue for my needs but worth knowing.

Diagnostic Tool
I consider a fault reading/clearing diagnostic tool to be an essential part of the modern vehicle’s toolkit but the iiD Tool by Gap is more than that. It can also perform service functions such as resetting the hand brake or putting the vehicle in Tight Tolerance Mode (TTM) for wheel alignment and many other service functions too numerous to mention on this page. But even better, it can read live values (eg temperature, pressure, voltage, etc), edit ECU software and modify the CCF, which is a configuration file of vehicle settings.
Reading live values can be of great use to establish baseline information about the way the vehicle operates when nothing is wrong, from which any departure can act as an early warning sign of issues. Service, support and advice from Gap is excellent but they are also developing new functionality and the capability for the tool has increased dramatically even in the relatively short period I've had one .
I have bought an extension cable to move the tool away from directly above the right foot when driving. It is vulnerable to getting kicked if left in situ when running live values.
Rear Camera Selection
I am quite proud of this one. It was easily the most complex, multi-faceted modification I have completed, requiring a huge amount of research and testing and extensive in-car installation that virtually all ends up hidden.
When towing the van I can now select between the D4 reverse camera and the van rear camera on the fly. Most of the time the van camera is all you need but occasionally it is useful to have a look at the tow point and draw bar, for example when hooking up or just anytime you want to confirm that all is ok with the Stone Stomper.
The Fakra Switching Relay is a pre-made item sourced from Germany and the selection switch is mounted where the sunroof switch would go if I had one. The 4-pin plugs and cable were purchased from eBay and are quite fiddly to work with due to the tiny wire size and inclusion of an earth sheath.

Components of the system are:
- NTSC rear view camera with the correct resolution
- Run lead with 4-pin plug from tow area up to rear storage via back of taillight following factory looms
- Splice video wire to RG154 video cable
- Install video relay switch into headline trim at boot including Fakra plugs to interrupt factory video cable
- Install busbar and splice a feed into switched power from 12S socket loom
- Run a 7-core trailer cable from rear storage cubby to front overhead console via passenger side door sills
- Install switch to light console and connect wires from 7-core
- Run video lead to driver side rear storage to allow for RCA switching box (future)

It works well and is really worth having but certainly not for the faint hearted as a project.


Voltmeter
I wanted to fit a panel voltmeter to facilitate easy monitoring of battery voltage and therefore SoC. It needed to be read from the outside so that the voltage when the D4 is asleep can be noted. This voltage will be the closest to the true battery SoC.
By having the three-position switch I can read either battery voltage or have it switched off to avoid the small battery drain and the visible LED drawing attention.
When battery voltage is above 12.0 the Traxide SC80 isolator keeps the batteries connected and as such there is only one system voltage. But the switch will be useful when/if there are battery issues and then I can be certain about the state of the cranking battery or aux battery by selecting the relevant one on the switch.
I spliced in to the aux battery feed "upstream" of the ABG-25.
This will allow me to read the aux battery voltage even when it is lower than 11.6V and the ABG-25 has activated (cut-out).
And also to monitor as voltage comes back up because the ABG-25 cuts back in at 12.5V
An almost perfect spot:
- visible from outside looking in the side window
- visible with rear drawers in place
- switch accessible
- only modify the one small panel that has its own part number
- relevant wiring easily accessible


Now we have developed the habit of checking the voltmeter reading first thing in the morning before opening any doors, which gives you a good indication of resting voltage and whether things are getting a bit low from the overnight running of the fridge.
Protective Film
Films can be applied to the whole car if desired but I have put it only on the rear wheel arch flares because they are exposed to flying stones flung from the front wheels. This can be reduced by better front mudflaps but not eliminated. There are also more temporary products that can be painted on and sprayed off which are useful as pre-planning for trips to remote areas or overgrown tracks. I have used Paint Shield by ShieldnPeel a few times now and have found it to be absolutely excellent, keeping out all scratches from lantana and other scratchy bushes. It is a much better option than cut & polish over and over.


Here’s one way to reduce the sun glare coming off the shiny chrome gear selector surround. The easier way is throw your hat over it but where's the challenge in that. It's a matt black automotive wrap that was carefully cut and applied. It's not perfect at a couple of corners but looks good to the casual inspection. I didn't expect it to last long but it's still going strong after a couple of years.

Driving Lights
We tend to avoid night driving as far as possible, especially when outback and rarely travel open roads at night either. So "proper" large spotlights such as Fyrlyts or a huge lightbar seemed unnecessary for my requirements. However I still felt that some additional light would be useful for those few times and for when offroad or getting to camp sites.
UPDATE
I have subsequently upgraded to Korr Lighting BZR160S 6" LED spotlights. While good, the Stedi lights just didn't quite offer enough light increase. If I ever decide to add lighting to the roof rack they will probably be pressed into service there.
The Prospeed brackets have been retained (through-grill portion, details below) but I designed a custom external bracket to hold the light and bolt to the Prospeed bracket. No wiring or switching changes required to what's described below.


Stedi make a nice range of good quality work lights, spotlights and lightbars and while looking through their range I found a 6 LED unit that seemed ideal, at least on paper. It's hard to judge how much is enough for my relatively low usage but I decided that at $80 each it was worth a punt.
Since fitting I've only done a quick night test so far and found a surprisingly large increase in light compared to high beam only (factory xenon), so I'm confident it's going to be exactly what I'm looking for. Their website provides good technical details.
Link > Slim LED Lightbar
For the through-grill support bracket I was set to go DIY after taking note of a few good examples on the forum. However all the brackets were designed for the more traditional bottom-mount spotlights or lightbars rather than the side mounting I needed. Using some stainless steel offcuts I spent hours trying to figure out a suitable design that I could detail and get fabricated. In the end I gave it away because anything I considered was clearly going to be difficult to measure and/or expensive to get made with my limited contacts. So then I looked at the two off-the-shelf products I knew of; Osbourne Park Auto Spark in WA and Prospeed in UK.
The Prospeed bracket is designed for a range of Lazer lights and lightbars and most importantly for me, the same style of side mounting as the Stedi. The Lazer lights have an excellent reputation and do offer a great light output for the size but you also pay a very high premium. After comparing the lights to my Stedi units I realised that the Lazer ST-4 has very similar dimensions so I contacted Prospeed querying whether the bracket could suit my Stedi light. I have to say their assistance was excellent, offering to include additional spacers to suit my narrower overall width (which weren't required in the end). They were also really good with after sales advice over the phone regarding refitting the grill, which is quite a tight fit for the facelift version.
Link > Prospeed Light Bracket

Here's some photos showing the support brackets installed without the external light bracket.
It looks to be a very robust design that I think will handle corrugated roads well.
The front plate with slotted holes sits just outside the grill once it's on.


Back to the list at the top